Integration Unit Testing in Action: MuleSoft
Your MUnit tests are green. Then you post a request from Postman and get back 201 Created. Is the API testing done?
An API seldom satisfies a business requirement on its own. It does so by working together with a database, a message queue or other APIs. This is illustrated in the MuleSoft API-led connectivity integration approach.
How do you test such an API? The traditional way is a combination of two types of testing:
- Unit testing. Write MUnit tests with various mocks for the database, message queue, etc., to avoid setting up the real dependencies for the API.
- API spec testing. Use an API client like Postman to call the API and check its response. This requires the API’s dependencies to be set up.
This combo has inherent flaws:
- The side effects of the API are not verified. Neither the MUnit test nor the API spec test checks that a record is actually inserted into the database, or a message is actually persisted into the queue.
- There are significant duplications in test data and testing logic between the two types of testing, which the team then has to maintain or govern.
- The MUnit tests are tightly coupled with the Mule flow’s internal implementation. For example, mocks and spies are hooked to specific processors in the flow. This makes the tests brittle. A simple refactoring of the Mule flow could result in many MUnit tests being broken.
Integration Unit Testing (IUT) is the way to address these problems. It extends API spec testing, using a single test case to verify both the API spec and the API side effects, while largely keeping unit testing’s merits — small, self-contained and fast to run compared to end-to-end tests.
With IUT, test duplications that are seen in the traditional combo are naturally gone, and test cases are durable, surviving refactorings of the API implementation. The traditional combo is no longer required for API testing. What’s left for MUnit is narrow: intensive internal testing of the API that involves no external dependencies — complex DataWeave transformations, for example.
This article will use a simple example Mule API to show you how to do IUT with API Test Base (ATB). ATB is a free, offline-first API testing tool. You can download and run it on your own machine, without any account or cloud.
The example
Section titled “The example”The example is a Mule flow, which implements a Create Order API for an online store. The API does the following things in sequence:
- Receives a product order’s data via a REST/HTTP request;
- Inserts the order data into a PostgreSQL database;
- Sends an order-created event message to an ActiveMQ queue for the fulfillment system to act on;
- And sends a response back to the HTTP client (typically a web or mobile UI) letting the customer know that the order has been created and is pending fulfillment.
So after receiving the request, the API does three things, but in traditional testing only one is verified against the deployed API — the HTTP response (the receipt). The database row and the message are the actual work, but
- In MUnit tests, they are only asserted against in-memory mocks. A mocked DB insert can’t fail on a column length constraint. And the MUnit test passes even when the data would land in the wrong DB columns.
- In API spec tests, they are simply not looked at.
We will walk through two red-green cycles a developer runs as part of API development:
- Create the IUT test case and run it to see red — of course, the Mule flow doesn’t exist yet.
- Create the Mule flow, and run the IUT test case to see green.
- Modify the IUT test case based on a requirement change from the BA, and run it to see red.
- Modify the Mule flow code for the requirement change, and run the IUT test case to see green.
The contract
Section titled “The contract”An API is usually built from a design document, which covers a lot of ground. It describes what the API does for the business, how it handles the request, which dependencies it works with and what response it sends back. It also carries the message formats and the mappings between them, the error handling, and the non-functional requirements such as expected volumes and security.
To test the API, we will create a contract derived from the full design document (assuming it is already available), and later on the IUT test cases will come out of the contract. By contract we mean everything the API promises, including HTTP request/response and the side effects, which are all observable from the outside. It essentially extends the API spec, which covers the request/response only.
Here is the contract:
Request — POST /api/orders
{ "customerCode": "C001", "productCode": "P100", "quantity": 2}Response — 201 Created
{ "orderId": 1, "status": "PENDING"}Side effect 1 — one row inserted into the orders table in PostgreSQL. Columns affected by this API:
| Column | Type | Value |
|---|---|---|
| order_id | BIGINT, generated identity, primary key | set by the database |
| customer_code | VARCHAR(20) | request customerCode |
| product_code | VARCHAR(20) | request productCode |
| quantity | INTEGER | request quantity |
| status | VARCHAR(20) | PENDING |
| created_at | TIMESTAMP NOT NULL DEFAULT now() | set by the database |
Side effect 2 — one JMS message published to the order.created queue in ActiveMQ:
{ "orderId": 1, "customerCode": "C001", "productCode": "P100", "quantity": 2, "status": "PENDING", "createdAt": "2026-09-13T09:14:22.417"}Notes:
-
In my real work, I never create the contract document. That is because I don’t want to maintain or govern duplicate documentation.
What I do instead is just create IUT test cases directly from the full design document. At the end of the day, the IUT test cases together express the contract in a runnable form.
-
The contract above covers only the happy path. A complete contract would also cover other cases like request validation and error handling.
Isolating the API under test
Section titled “Isolating the API under test”To test the API against its contract, we can’t use a shared environment like SIT, because other people using the environment would interfere. Examples:
- Your check that exactly one row was inserted could fail, because another developer or tester is creating an order from the UI at the same time.
- You are unable to verify that the order-created event message is successfully persisted into the queue, because the message is immediately picked up by the downstream fulfillment system.
We need to have full control over the IUT environment, so that we can set it to a known state before running the test case. This state can’t be touched by anyone else when the test case runs. This is called test isolation.
In our example, the API is deployed in the IUT environment (your local machine or the CI/CD runner), and isolated by
- Spinning up a Docker container hosting a PostgreSQL database. The database has only one table in it — the orders table, which is tailored for our testing purposes;
- Spinning up a Docker container hosting a blank ActiveMQ instance;
- And configuring the API to connect to these two stubs.
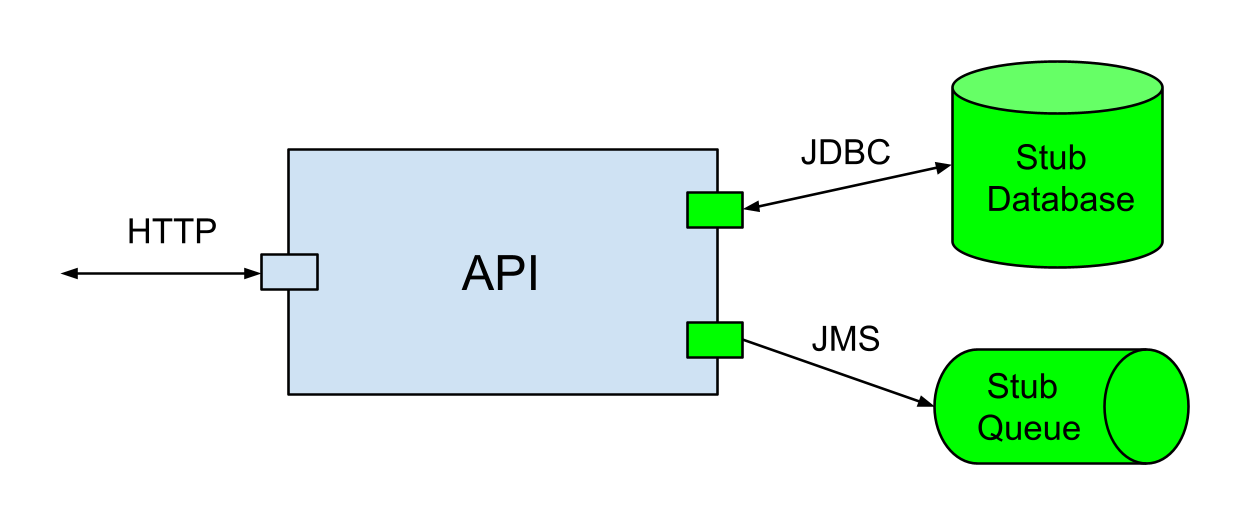
When the API is called by the IUT test case, the API will do its job to change the state in the stubs as specified by the contract. And then the test case will verify the resulting state in the stubs against the contract.
In IUT, the API under test is the unit, and the stubs are the isolation around it, making it possible to test the unit alone. The stubs are actual systems running in separate processes, hence enabling the test to verify both the protocols and the resulting state. Traditional unit testing mocks the API’s dependencies in the same process, bypassing both verifications.
The stubs are started by the test setup and can be thrown away after the test. So you don’t have to maintain the environment state for future reuse.
What you’ll need to follow along
Section titled “What you’ll need to follow along”Enough theory. Now let’s use ATB to do IUT against the Create Order API. I highly recommend that you run it yourself as you read, to get the most out of the article. For that you’ll need:
- API Test Base (desktop app) installed and launched.
- Docker Desktop running.
- Anypoint Studio with a Mule 4.12 runtime (tested with Studio 7.28.0 and its embedded Mule EE runtime 4.12.2; newer versions should also work).
- Ports
5432,61616,8161and8081free — for the stub database, the stub broker (JMS and web console) and the API.
The ATB workspace
Section titled “The ATB workspace”ATB test artifacts like folders and test cases live in a workspace, which is a folder containing the workspace metadata.yaml file and the test artifacts.
Each test artifact is declared in its own YAML file.
A workspace is typically in a dedicated VCS (e.g., Git) repository, to enable team collaboration at the workspace level.
The ATB workspace has already been created, so just clone the repo into ATB’s fileplace folder:
cd "<ATB_DATA_DIR>/fileplace"git clone https://github.com/apitestbase/mule-online-store-integration-unit-tests.gitTo find out where <ATB_DATA_DIR> is, refer to Administration.
ATB picks the workspace up automatically, with no restart needed. Select it from the workspace dropdown list in the top left corner of the ATB UI.
The workspace has the following structure:
[Workspace] mule-online-store-integration-unit-tests├── [Folder] Common Test Setups│ ├── [Test Case] Create Orders Table│ ├── [Test Case] Start ActiveMQ Stub│ └── [Test Case] Start PostgreSQL Stub│└── [Folder] REST API Tests └── [Folder] Create Order API ├── [Setup Reference] → [Folder] Common Test Setups / [Test Case] Start PostgreSQL Stub ├── [Setup Reference] → [Folder] Common Test Setups / [Test Case] Create Orders Table ├── [Setup Reference] → [Folder] Common Test Setups / [Test Case] Start ActiveMQ Stub └── [Test Case] Create order successfullyThe Common Test Setups folder contains common setups that are reusable across different folders.
The REST API Tests folder contains test cases for REST APIs exposed by the online store application, one sub-folder per API.
The Create Order API folder contains the IUT test cases for the API, and it references the common setups, so that you can run the folder with the setups being executed before the test cases under it.
We have only one test case here, but it is still worth introducing this structured way of managing test setup, which is recommended for your own workspaces. Refer to Structured Test Setup for more details.
There are also two environments included in the workspace — Local and CICD.
An environment holds the endpoints the test case talks to, here the endpoints of the stub database, the stub broker and the API under test.
The Local environment is used when running the setup and IUT test case on your local machine. It is typically used during API development.
The CICD environment is used when running the setup and IUT test case in a CI/CD pipeline.
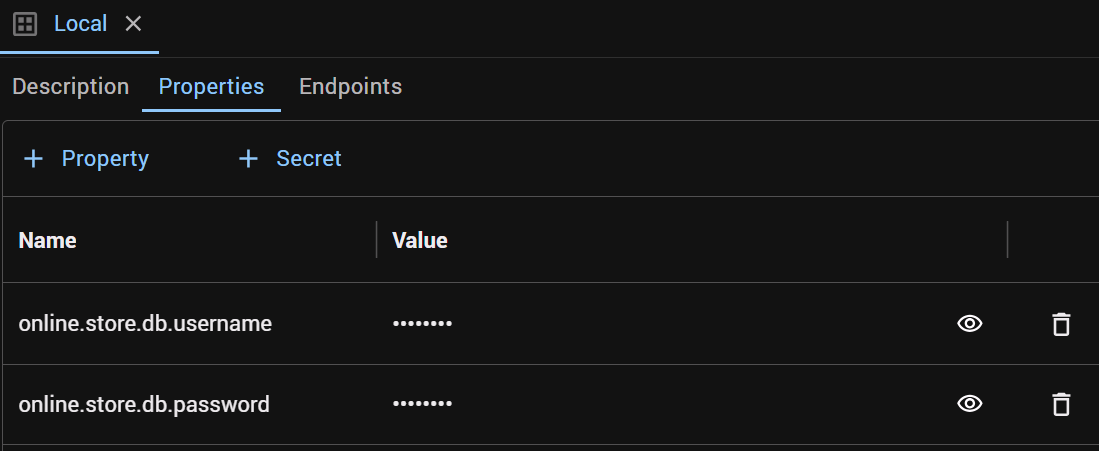
Open the Local environment, and enter the values for the online.store.db.username and online.store.db.password secrets (secret values never travel with a workspace). Here we use value postgres for both.
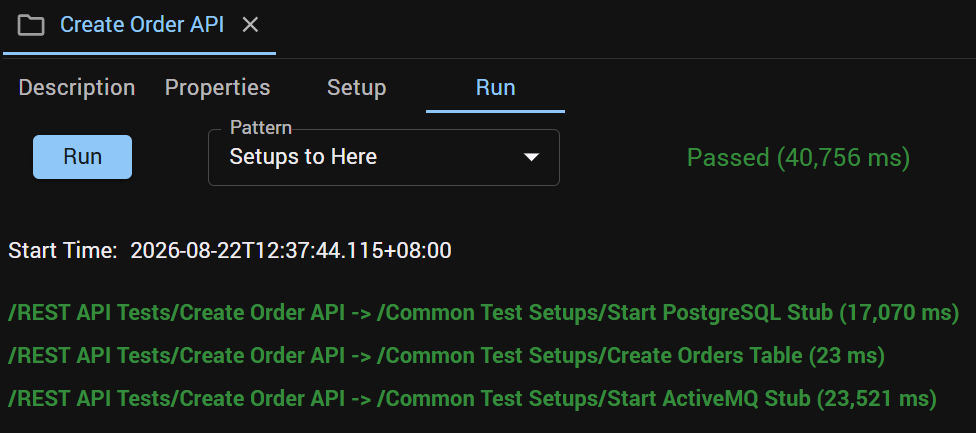
Select the Local environment in the top right corner of the ATB UI, open the Create Order API folder, and run it with pattern Setups to Here.
This runs the setups referenced by the folder.
The test case
Section titled “The test case”With the setup done, the API’s dependency stubs are up and running. The next step is the test case, which should come out of the contract.
Nothing so far required the Mule app to exist. The contract itself is enough for writing the test case.
The test case is already included in the repo. If you’d like to create it yourself, refer to Creating an Automated Test Case.
Here are the test steps in the test case:
1. (DB step) Clear the orders table2. (JMS step) Clear the order-created event queue3. (HTTP step) Invoke the API4. (DB step) Verify the orders table data5. (JMS step) Verify the event count6. (JMS step) Verify the event payloadSteps 1 and 2 do the test-case-specific setup, setting the stubs to a known starting state, so that the later assertions are exact.
Step 3 calls the API and asserts the response.
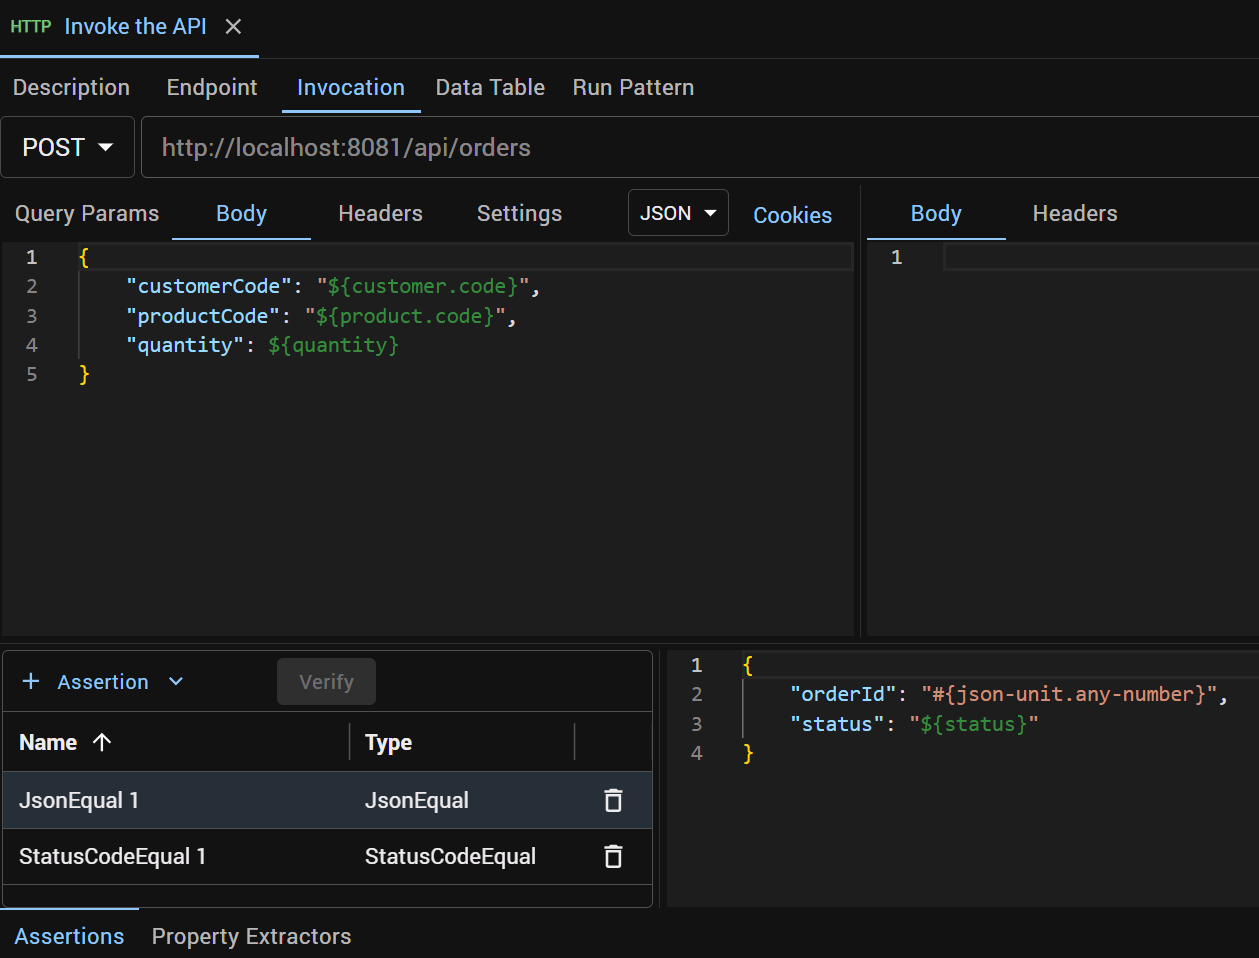
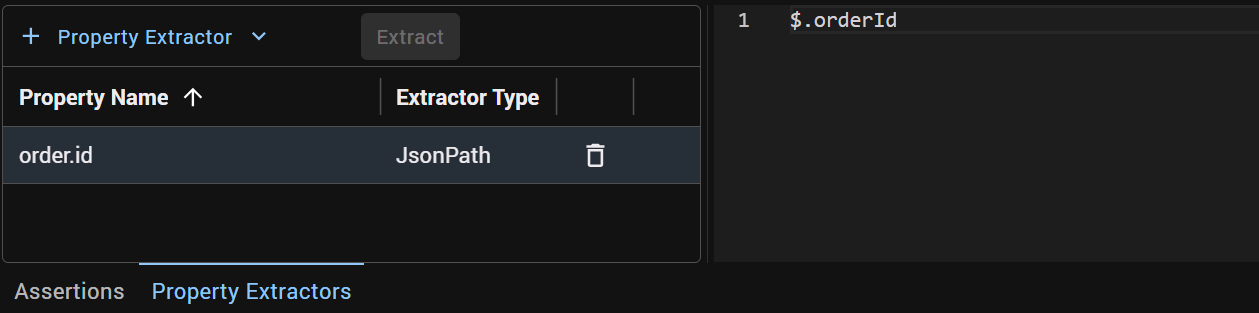
A property extractor captures the generated orderId from the response as property order.id, for use in later steps.
Step 4 verifies side effect 1, by asserting exactly one row has been created in the orders table, with the expected content.
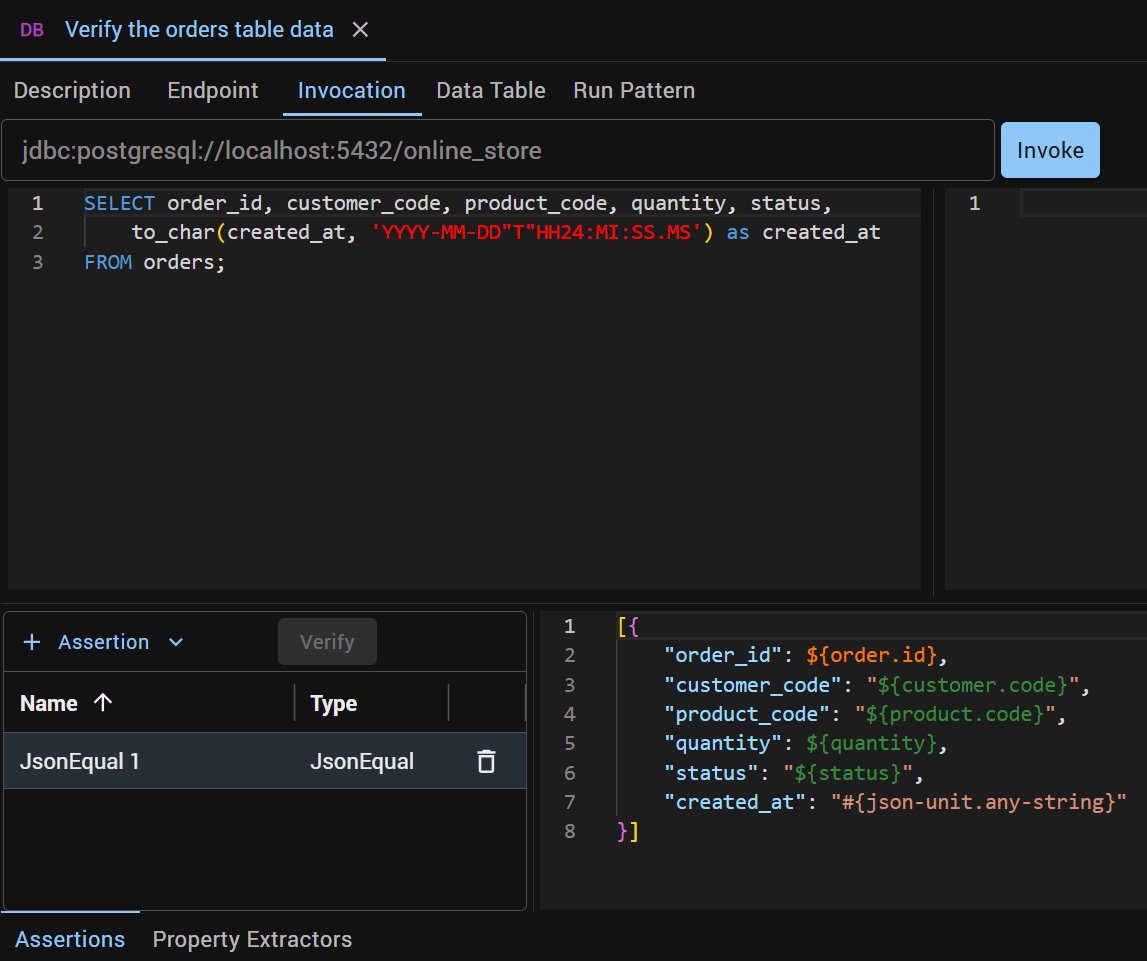
The created_at value is dynamically set by the database, and it isn’t in the API response.
So the assertion only checks that the value is there, using #{json-unit.any-string}.
The SELECT formats created_at the same way as the event’s createdAt (e.g., 2026-09-13T09:14:22.417).
A property extractor then captures it as property created.at, for use in step 6.
![The same step's Property Extractors tab: a JsonPath extractor with property name created.at and JSON path $[0].created_at](/screenshots/iut-in-action/mulesoft/orders-table-verification-step-with-property-extractor.png)
Step 5 verifies the first part of side effect 2, by asserting that the event queue depth is exactly 1 — one order in, one event out, no more.

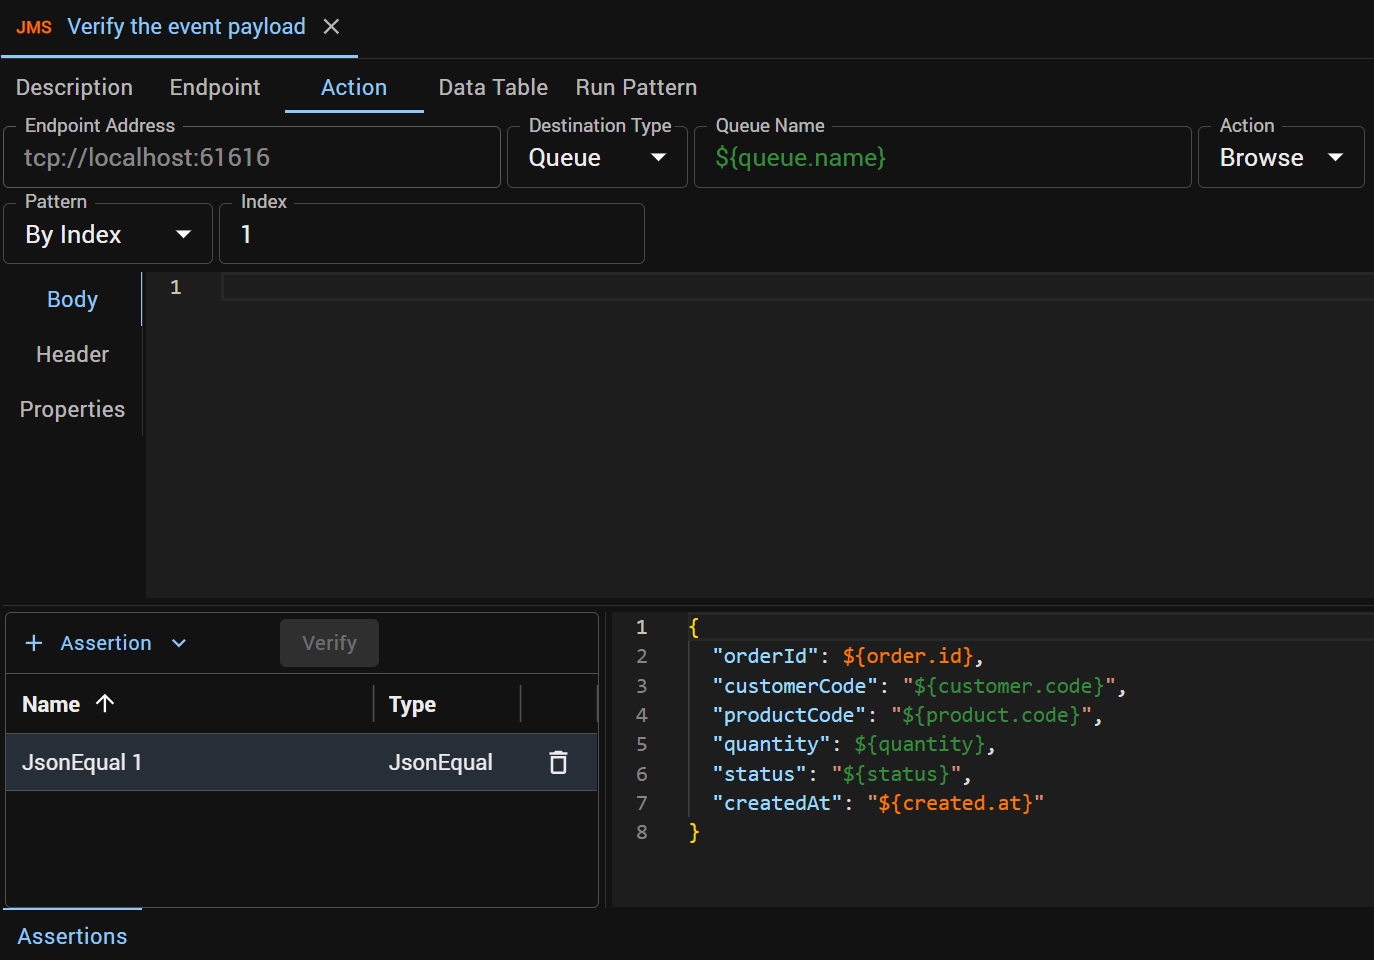
Step 6 verifies the second part of side effect 2 — the payload content.
Its createdAt equals ${created.at}, the exact value captured from the row in step 4.
Notes:
${customer.code},${product.code}, etc. are reusable properties defined on the test case or extracted by a property extractor. Refer to Properties for more details.#{json-unit.any-number}and#{json-unit.any-string}are placeholders used in “shape matching” assertions. Refer to the Assertions page for more details.
Now we have a single, low-code test case to set up a known state, trigger the API and verify every promise in the contract.
The first red
Section titled “The first red”Run the test case on its own, and it fails — as expected, because the Mule app doesn’t exist yet.
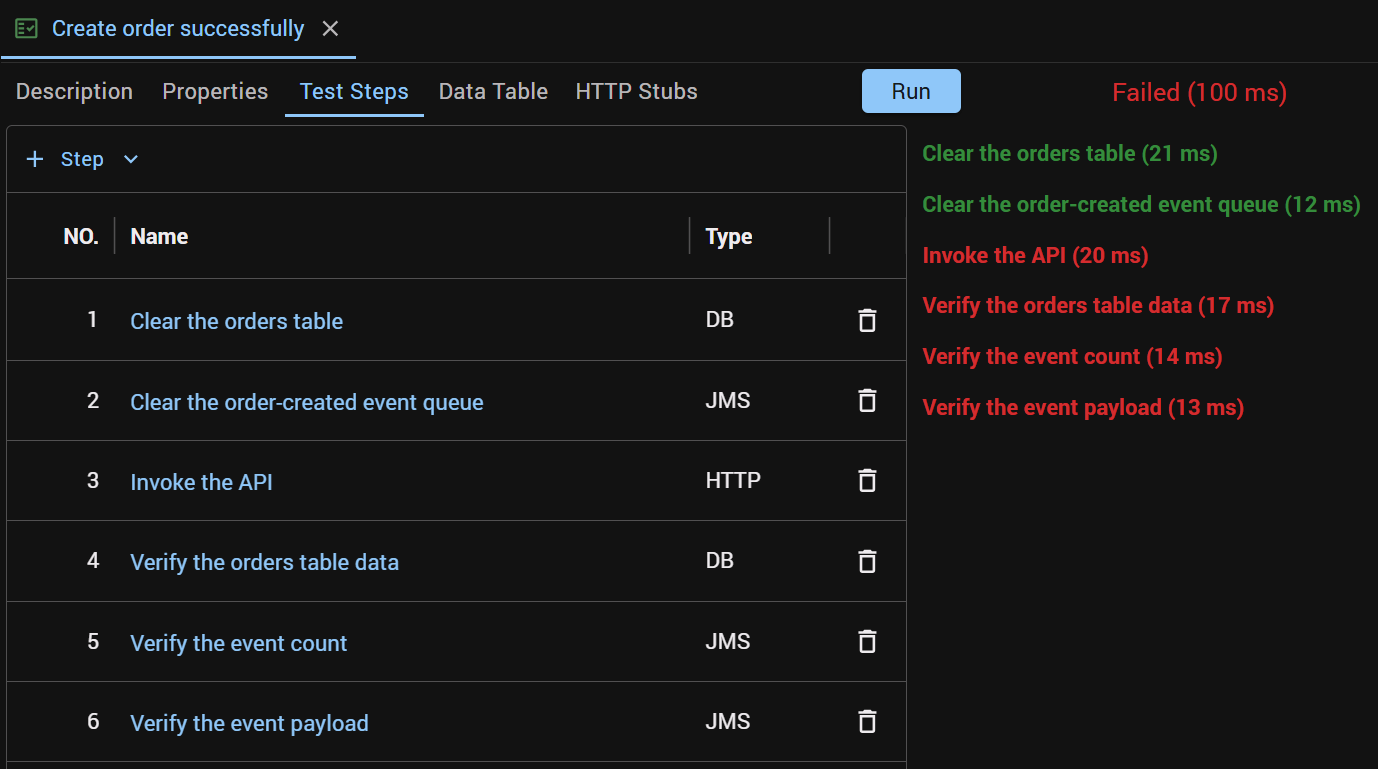
The red is satisfying, as it tells me the test case invokes a real HTTP API (which isn’t there yet) and inspects real dependencies.
The Mule app
Section titled “The Mule app”In real-world work, this is where you would develop the Mule app. To keep the demo simple, we are not going to show how to develop it. The app is already prepared at mule-online-store-create-order-api.
Clone the repo and import the project into your Anypoint Studio.
The Mule flow looks like the following:
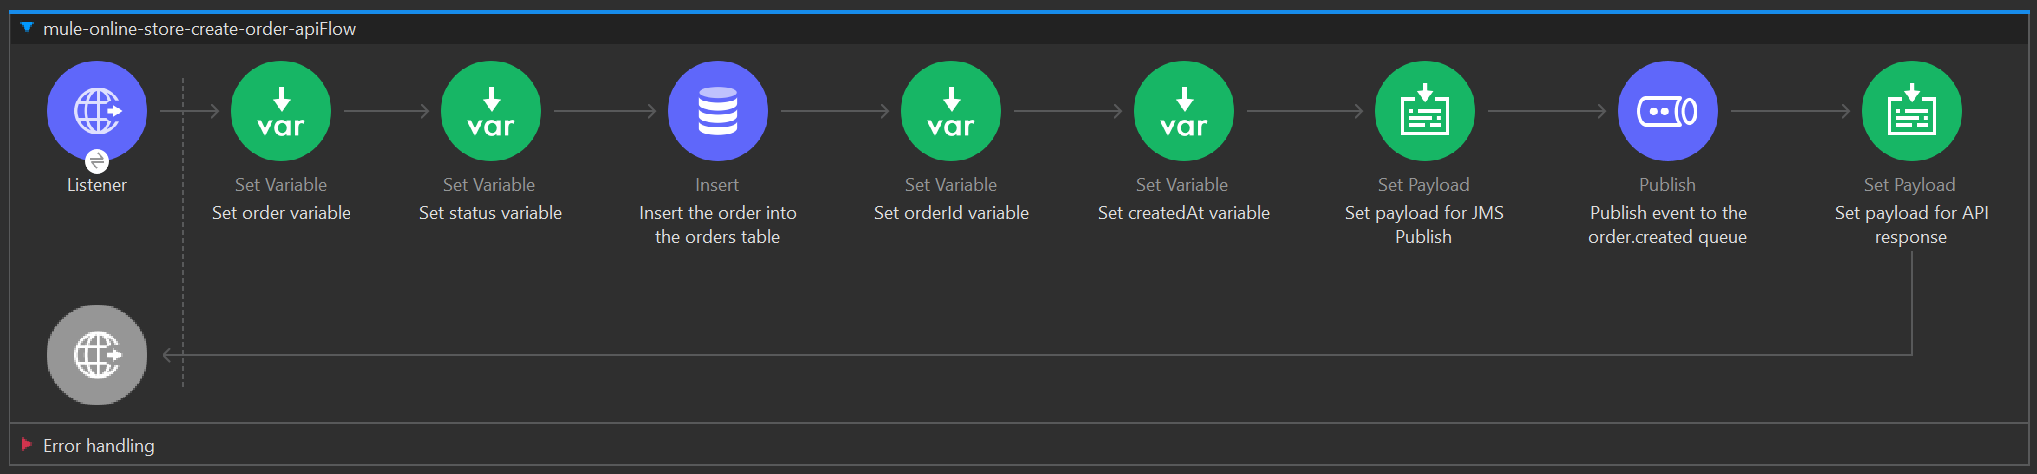
The API is already pointed at the stubs, so there is nothing for you to configure here. It is worth a look anyway, because this is the third part of the isolation.
The app keeps its dependency addresses out of the flow, in one config file per environment:
src/main/resources/config/├── local.yaml├── cicd.yaml├── test.yaml└── prod.yamllocal.yaml is the one in effect here, and it points at the two containers the setup started:
db:  url: "jdbc:postgresql://localhost:5432/online_store"  user: "postgres"  password: "postgres"
jms:  broker:    url: "tcp://localhost:61616"
Start the Mule app in Anypoint Studio. The API under test is now up and running.
The first green
Section titled “The first green”Run the test case in ATB, and you should see it Passed.
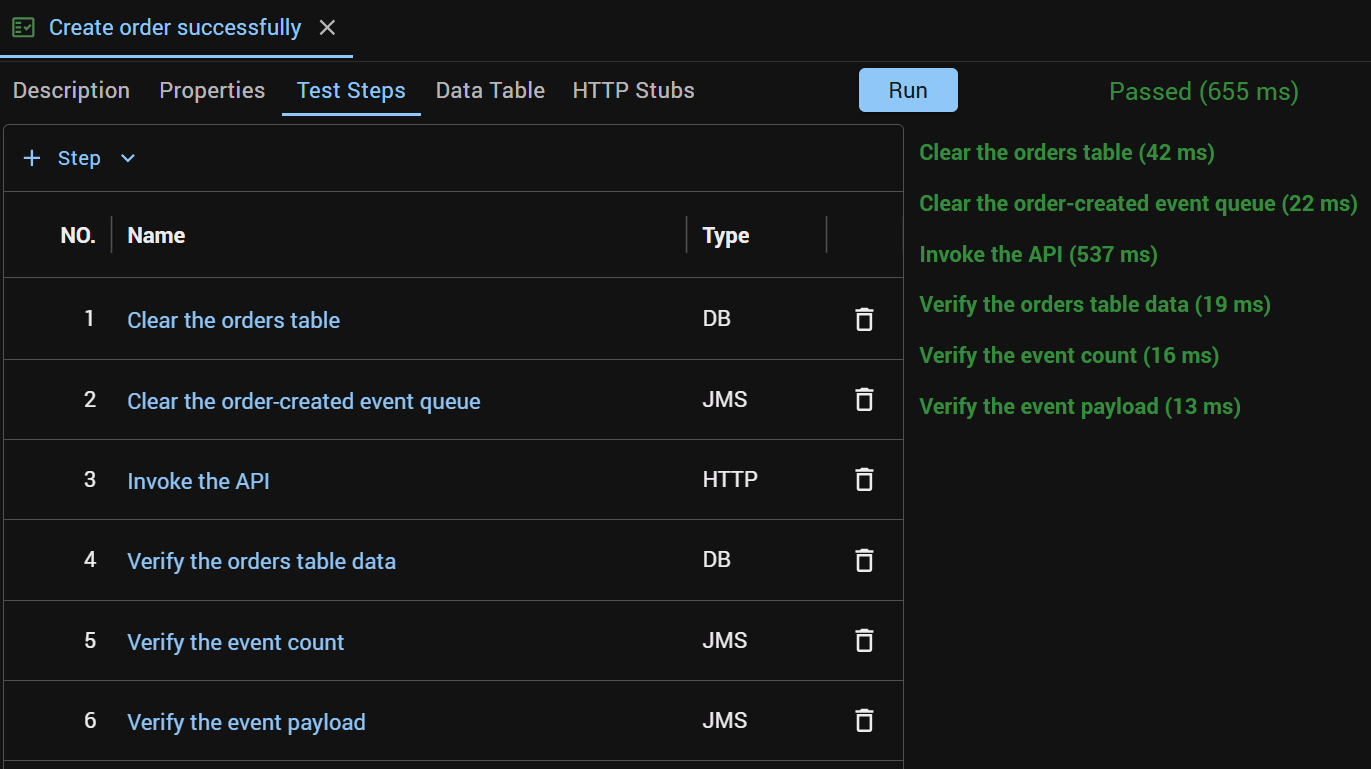
It verifies that the API conformed to the contract: received the request, returned the expected response, inserted the expected row into the orders table and published the expected JMS message to the order.created queue.
One thing to notice: step 6 checks that the event’s createdAt is the same timestamp as in the database row. MUnit can’t check that with mocks. A database mock returns a timestamp the test itself generated, so the MUnit assertion only proves the flow copied it through — the row in PostgreSQL is never consulted.
The requirement change
Section titled “The requirement change”A common scenario is that a requirement change comes from the BA sometime after the API has already gone live in production. When that happens, I update the design document first. Then, based on the new design, I update the IUT test case, and after that I change the Mule code.
In this article, let’s assume the online store is introducing express delivery. At checkout, the customer can now choose between standard and express delivery. The fulfillment system needs to know which one was chosen, so that it can pick and dispatch express orders first.
So the contract needs to change in three places.
The request is to carry a new field, deliveryOption, with value STANDARD or EXPRESS:
{ "customerCode": "C001", "productCode": "P100", "quantity": 2, "deliveryOption": "EXPRESS"}Side effect 1 gains a new column in the orders table:
| Column | Type | Value |
|---|---|---|
| delivery_option | VARCHAR(20) | request deliveryOption |
Side effect 2 gains a new field in the message payload:
{ "orderId": 1, "customerCode": "C001", "productCode": "P100", "quantity": 2, "status": "PENDING", "deliveryOption": "EXPRESS", "createdAt": "2026-09-13T09:14:22.417"}Accordingly, our test setup and test case need to change as follows:
- The stub orders table is built from the contract, so it needs the new column too. Update the SQL of the
Create Orders Tablesetup test case in theCommon Test Setupsfolder:
DROP TABLE IF EXISTS orders;
CREATE TABLE orders ( order_id BIGINT GENERATED ALWAYS AS IDENTITY PRIMARY KEY, customer_code VARCHAR(20), product_code VARCHAR(20), quantity INTEGER, status VARCHAR(20), delivery_option VARCHAR(20), created_at TIMESTAMP NOT NULL DEFAULT now());-
Run the
Create Order APIfolder again with patternSetups to Here, to recreate the table with the new column. Every setup is repeatable, so running the folder again is safe. -
On the
Propertiestab of theCreate order successfullytest case, add a propertydelivery.optionwith valueEXPRESS. -
Update the
Invoke the APIstep’s request body to includedeliveryOption:
{ "customerCode": "${customer.code}", "productCode": "${product.code}", "quantity": ${quantity}, "deliveryOption": "${delivery.option}"}- Update the
Verify the orders table datastep’s request SQL to include thedelivery_optioncolumn:
SELECT order_id, customer_code, product_code, quantity, status, delivery_option, to_char(created_at, 'YYYY-MM-DD"T"HH24:MI:SS.MS') as created_atFROM orders;- Update the
Verify the orders table datastep’s JsonEqual assertion to includedelivery_option:
[{ "order_id": ${order.id}, "customer_code": "${customer.code}", "product_code": "${product.code}", "quantity": ${quantity}, "status": "${status}", "delivery_option": "${delivery.option}", "created_at": "#{json-unit.any-string}"}]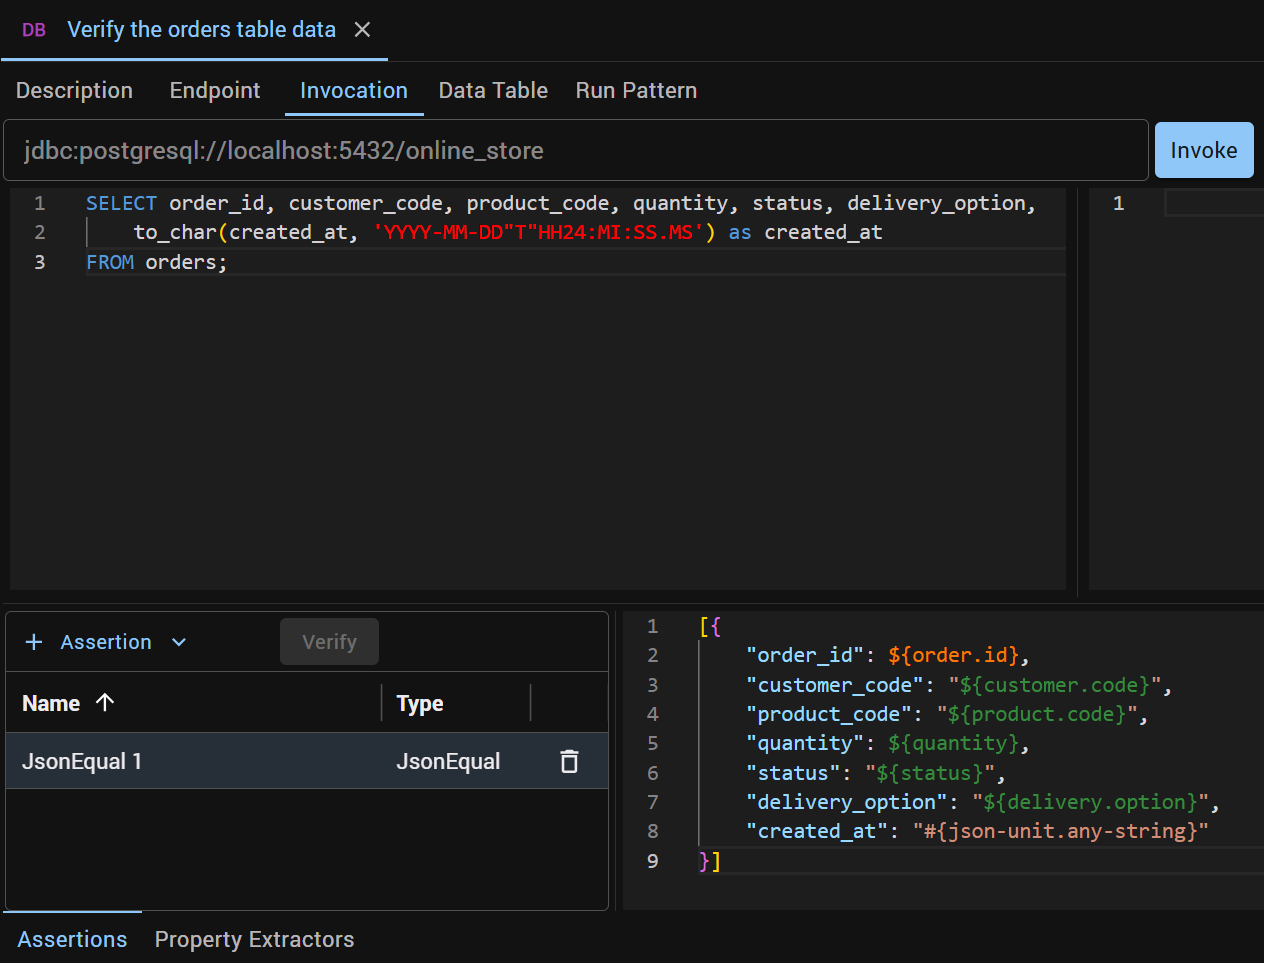
- Update the
Verify the event payloadstep’s JsonEqual assertion to includedeliveryOption:
{ "orderId": ${order.id}, "customerCode": "${customer.code}", "productCode": "${product.code}", "quantity": ${quantity}, "status": "${status}", "deliveryOption": "${delivery.option}", "createdAt": "${created.at}"}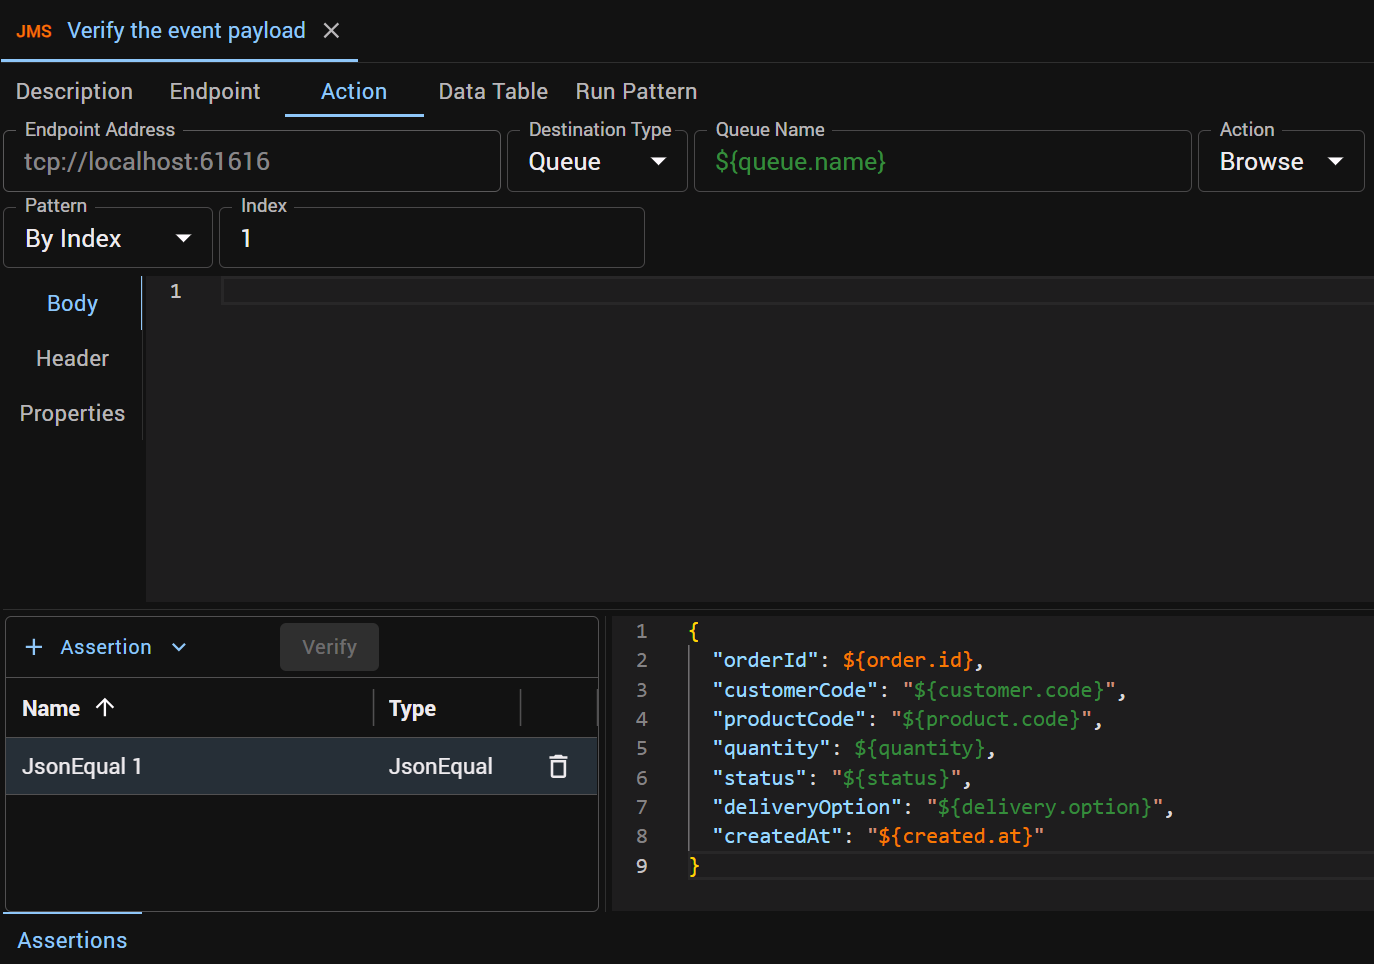
The second red
Section titled “The second red”Run the test case to see it Failed, this time at two steps: Verify the orders table data and Verify the event payload.
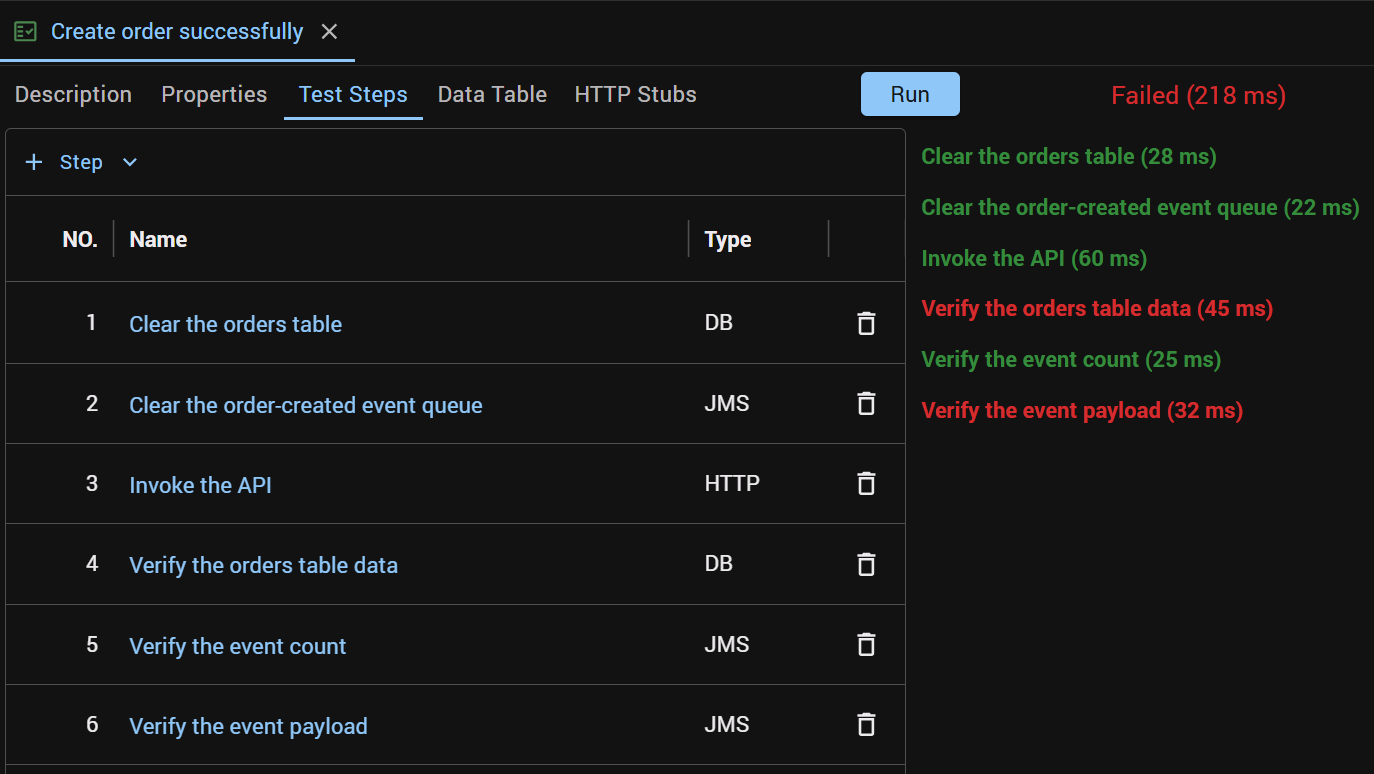
The orders table now has the delivery_option column, but the current Mule flow doesn’t write to it, so the column stays NULL.
The event is still published without deliveryOption.
Now look at the Invoke the API step. It passed.
The API still returns 201 Created with the same response body, because the response is not part of the change.
A test that checks only the response, such as an API spec test in Postman, would be green at this point.
Yet the delivery option the customer chose has reached neither the database nor the fulfillment system.
A 201 Created doesn’t mean the API has done its job.
The Mule flow code change
Section titled “The Mule flow code change”Change the Mule flow code as follows:
- In the
Insert the order into the orders tableprocessor, update the SQL query text to:
INSERT INTO orders (customer_code, product_code, quantity, status, delivery_option)VALUES (:customerCode, :productCode, :quantity, :status, :deliveryOption)- In the same processor, update the input parameters to:
{ 'customerCode': payload.customerCode, 'productCode': payload.productCode, 'quantity': payload.quantity, 'status': vars.status, 'deliveryOption': payload.deliveryOption}- Update the DataWeave script of the
Set payload for JMS Publishprocessor to:
%dw 2.0output application/json---{ 'orderId': vars.orderId, 'customerCode': vars.order.customerCode, 'productCode': vars.order.productCode, 'quantity': vars.order.quantity, 'status': vars.status, 'deliveryOption': vars.order.deliveryOption, 'createdAt': vars.createdAt as String {format: "yyyy-MM-dd'T'HH:mm:ss.SSS"}}Restart the Mule app for the code change to take effect.
The second green
Section titled “The second green”Now run the test case to see it Passed again.
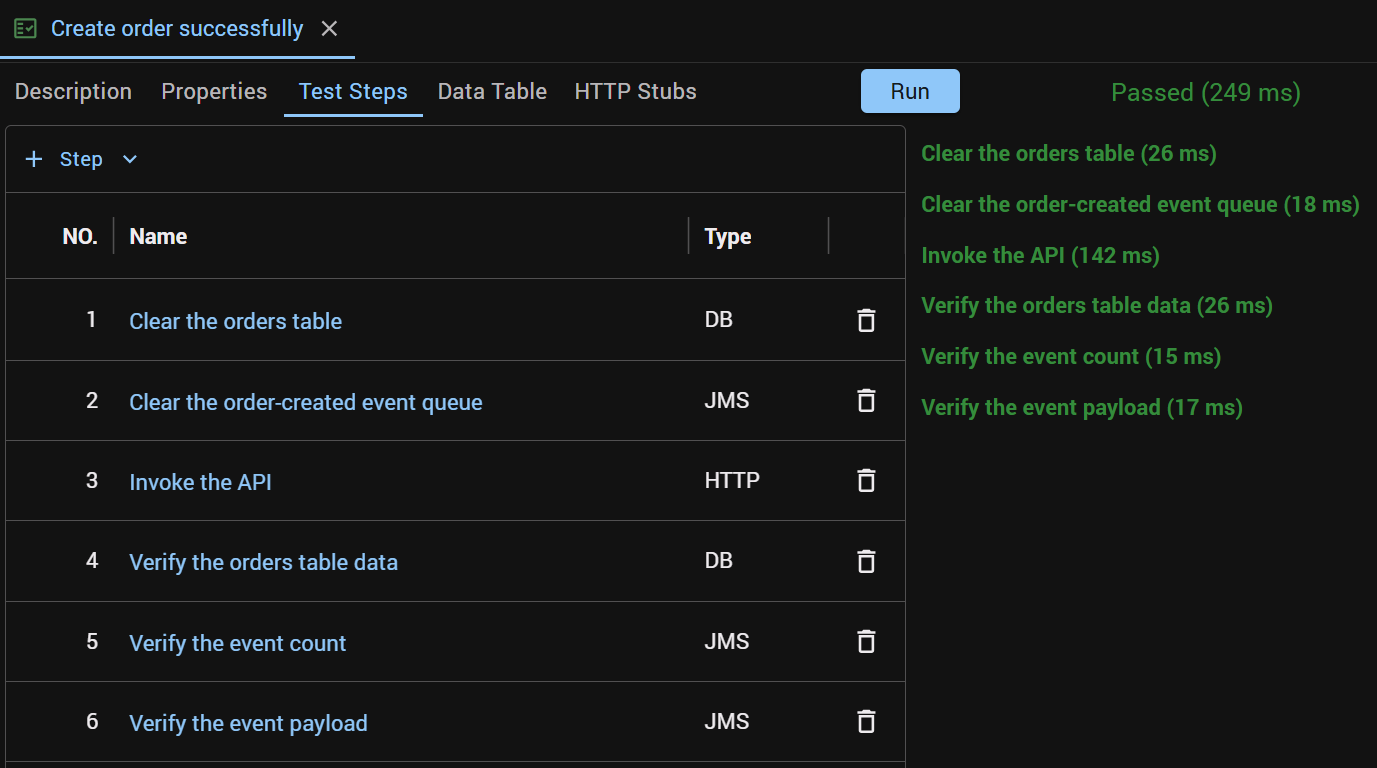
The updated API code is successfully verified against the updated contract.
The close
Section titled “The close”So far we have demonstrated how to use ATB to do Integration Unit Testing during API development in a test-first manner. We covered both testing a new API and testing a change to an existing one, which you are probably doing every day.
You don’t have to do test-first. Test-last will also work. Just remember to always create or update test cases based on the design document (or contract) rather than the existing code. Otherwise, the test cases are just a “mirror” of the existing code, which could be inconsistent with the design (hence the same defects in both the code and the test cases).
IUT verifies the API’s side effects against real dependency systems, hence verifying both the protocols and the actual resulting state of the dependencies. Mocks don’t see these. And unlike end-to-end testing, IUT is still easy to set up and fast to run while you code. In summary, I think IUT does a better job and should take the place of the traditional combo for API testing.
If you haven’t already, download ATB and try Integration Unit Testing on one of your own APIs.
When you’re ready to automate it, the same ATB test case can run unchanged in a CI/CD pipeline. See Integration Unit Testing Automation in CI/CD Pipeline.
Part of the Integration Unit Testing in Action series.